Shelter calculator
Estimate materials for a shelter — classic, compact, family or A-frame. Includes a step-by-step guide.
Choose a shelter type
Shelter calculator
Pick a shelter type and get a materials estimate, a grouped shopping list and an A–Z build guide. Designed for DIY and scout / club projects.
Height at the open front of the shelter.
Height at the back — usually lower than the front.
Used as size guidance only — not part of the material calc.
Your shelter project
Classic lean-to shelter: 300×220 cm, 210/150 cm — 6.6 m² floor, 6.84 m² roof
Floor area
6.6 m²
Roof area
6.84 m²
Wall area
12.42 m²
Rafters
6 pcs
Floor joists
6 pcs
Posts
5 pcs
Base frame
13.4 lm
Waste
12 %
Materials
Keep the base frame off the ground so the timber doesn't rot.
Lay under the base frame as a moisture barrier.
Perimeter + middle stiffener if depth > 2 m. Use pressure-treated timber.
Approx 60 cm apart across the width (300 cm).
Includes a small waste margin. Skip if you chose 'no floor'.
Carry the roof and define the shape. 4 corners + extras on a wide front.
Connect the posts at the top and carry the rafters.
Approx 60 cm apart. Count: ⌈300 ÷ 60⌉ + 1.
Base layer for felt or metal sheets. Includes waste.
Calculated from roof area + waste. Check pack size at the supplier.
Finish the roof edges and keep rain out.
Back wall + 2 sides. Includes waste.
Behind the cladding as fixing rails and ventilation gap.
Used at rafters / A-frames and frame joints.
1 pack for frame, rafters and structural joints (~250 pcs).
1 pack for cladding, floor and small fixings.
Pick the ones that match your chosen roof covering.
Approx 1 litre per 10 m² for two coats. Clear or pigmented as preferred.
To get the base frame level and the dimensions right.
Jigsaw or circular saw + a strong drill for the construction screws.
Especially when sawing pressure-treated timber.
For the wood treatment — pick a width that suits battens and boards.
ℹThis calculator provides an estimated materials list. Always adapt dimensions, fastening and foundation to local conditions, loads, wind exposure and applicable rules.
ℹCounts and lengths are rounded up. Check board lengths and pack sizes at your supplier before buying.
Example: Classic 300×220 cm lean-to
A classic 300 cm wide, 220 cm deep, 210/150 cm tall lean-to gives about 6.6 m² of floor, 7.1 m² of roof, 6 rafters and 6 posts.
Estimate for a classic shelter with default values:
The example is simplified — the actual shopping list is built live from your own measurements and choices.
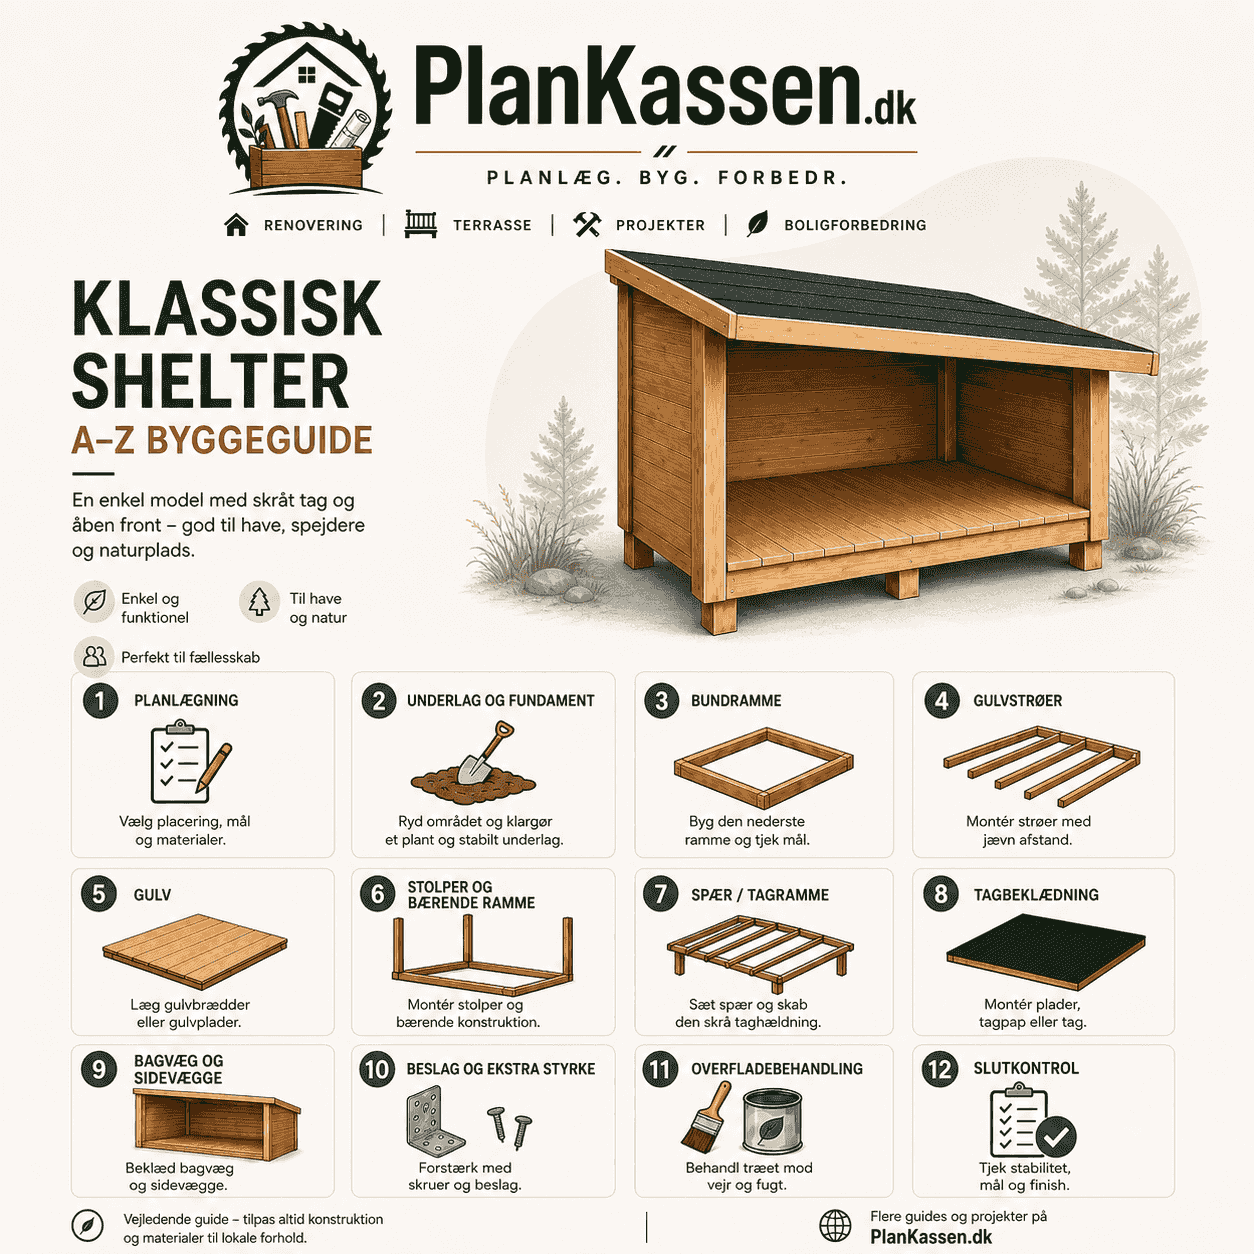
How to build your shelter — A to Z
A. Planning
Pick a type, dimensions, location and budget. Check local rules — small shelters often don't need a permit, but rules vary. Agree the exact location with the landowner or club.
B. Groundwork and foundation
Mark out with strings and pegs. Lay geotextile or felt as a moisture barrier, and place 4–6 foundation blocks so the base frame stays clear of the ground.
C. Base frame
Build the rectangular frame in pressure-treated timber. Check the angles by measuring both diagonals — they should be equal.
D. Floor joists
Lay floor joists across the frame about 60 cm apart. Fix them with angle brackets for extra strength.
E. Floor
Screw down floor boards or plywood onto the joists. Optionally leave a small ventilation gap to the walls.
F. Posts and structural frame
For a classic lean-to: raise corner and front posts, fix top plates front and back. For an A-frame: assemble each A on the ground and lift one at a time onto the ridge beam.
G. Rafters / roof frame
Lay rafters on the top plates ~60 cm apart (classic), or connect the A-frames with the ridge beam (A-frame). Use angle brackets and construction screws.
H. Roof covering
Lay plywood/OSB as decking, then the chosen covering (felt, metal, shingles). Start from the bottom and overlap towards the rain direction.
I. Back wall and side walls
Add battens, then cladding. Leave a ventilation gap behind the cladding so moisture can escape. (Skip on an A-frame.)
J. Brackets and extra bracing
Add extra angle brackets at all corners and joints. Check the frame is stable and not racked.
K. Wood treatment
Apply 2 coats of wood preservative — clear or pigmented. Wait for dry weather and let each coat dry fully.
L. Final check
Make sure all screws are tight, the roof is watertight, and the floor doesn't flex. Take photos before the first overnight stay — handy for any later changes.
How to use this calculator
Four quick steps – you don't need to be a tradesperson to follow them.
- Pick a shelter type that fits your project — classic lean-to, compact, family/group or A-frame.
- Check and adjust the dimensions: width, depth and heights. The defaults are sensible starting points.
- Choose roof type, floor type and cladding. The calculator builds a grouped shopping list.
- Review the materials estimate and the A–Z build guide before you go to the hardware store.
Common mistakes
Small things that often cost an extra trip to the hardware store.
- Not lifting the base frame off the ground — the timber rots within a couple of seasons without blocks or stones underneath.
- Too little roof slope. A lean-to needs a clear difference between front and back so water runs off.
- Forgetting a ventilation gap behind the cladding — moisture escapes when there's a small gap top and bottom.
- Skipping pressure-treated timber on the base frame to save a few quid — usually the first thing you regret.
- Calculating without waste. 10–15 % on roof and cladding is normal.
Example: classic 300 × 220 cm shelter
With 300 cm width, 220 cm depth and 210/150 cm heights you get about 6.6 m² of floor and 7.1 m² of roof. That's typically 6 rafters (60 cm apart), 6 floor joists and 4–6 posts. Add 12 % to the roof and wall area for off-cuts and mistakes.
Frequently asked questions
Short answers to the questions we hear most often about this calculator.
Do I need planning permission for a shelter?
It depends on the local rules and the size. Small shelters often don't need a permit, but always check with your local authority first.
What timber should the base frame be?
Use pressure-treated timber for anything close to the ground. Cladding and rafters can be regular construction timber.
How long does a shelter last?
With proper finishing, foundation blocks and ventilation gaps a home-built shelter easily lasts 15–20 years.
Is the calculator a structural design tool?
No. It's a materials estimate for DIY and club projects. Always adapt dimensions and fixings to local conditions, wind and snow loads.
Use the results in a real project
With MyPlanDIY you can save materials, create budgets, track tasks and bring everything together in one project.
No credit card required. Free sample project included.
See also
Keep going with one of these – they pair well with what you just read.
Related guides
Deck project from start to finish
Step-by-step guide to planning and building a deck. Measuring, materials, budget and mistakes.
Read guide →Build a drywall partition wall
Stud spacing, sheets, screws and the usual pitfalls. A clean DIY partition wall.
Read guide →Install laminate flooring yourself
Prep, underlay, layout and the mistakes to skip. A practical DIY guide.
Read guide →Try these calculators
Deck calculator
Calculate the number of deck boards, screws and joists for your deck.
Open calculator →Drywall calculator
Calculate the number of drywall sheets or panels for walls or ceilings.
Open calculator →Flooring calculator
Calculate packs of laminate or floorboards based on area and waste.
Open calculator →